BGP next-hop-self, community no-export & send-community – GNS3 Lab
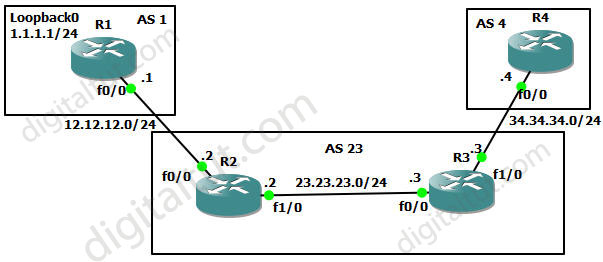
In this GNS3 lab we will learn how to establish neighborship between routers running BGP and use BGP attributes to control how a route is advertised to its neighbors. In this lab I wish to show how to create a basic “BGP network” and explain about next-hop-self, community no-export & send-community features in BGP. Below is the topology of this lab:

IOS used in this lab: c3640-jk9s-mz.124-16.bin
Objectives of this lab:
+ Task 1: Configure EBGP on AS 1, AS 23, AS 4 and configure IBGP between R2 & R3 (AS23)
+ Task 2: Advertise loopback0 on R1 to R4 and make sure R4 can ping to that loopback interface (AS23 becomes a transit AS)
+ Task 3: Make AS 23 not a transit AS by using the feature “community no-export”
First we will configure all IP addresses of this lab and turn on all the interfaces:
Configure IP addresses on all interfaces
| R1(config)#interface f0/0 R1(config-if)#ip address 12.12.12.1 255.255.255.0 R1(config-if)#no shutdown |
R3(config)#interface f0/0 R3(config-if)#ip address 23.23.23.3 255.255.255.0 R3(config-if)#no shutdown R3(config)#interface f1/0 R3(config-if)#ip address 34.34.34.3 255.255.255.0 R3(config-if)#no shutdown |
| R2(config)#interface f0/0 R2(config-if)#ip address 12.12.12.2 255.255.255.0 R2(config-if)#no shutdown R2(config)#interface f1/0 R2(config-if)#ip address 23.23.23.2 255.255.255.0 R2(config-if)#no shutdown |
R4(config)#interface f0/0 R4(config-if)#ip address 34.34.34.4 255.255.255.0 R4(config-if)#no shutdown |
Task 1: Configure EBGP & IBGP
| R1(config)#router bgp 1 R1(config-router)#neighbor 12.12.12.2 remote-as 23 |
R3(config)#router bgp 23 R3(config-router)#neighbor 23.23.23.3 remote-as 23 R3(config-router)#neighbor 34.34.34.4 remote-as 4 |
| R2(config)#router bgp 23 R2(config-router)#neighbor 12.12.12.1 remote-as 1 R2(config-router)#neighbor 23.23.23.3 remote-as 23 |
R4(config)#router bgp 4 R4(config-router)#neighbor 34.34.34.3 remote-as 23 |
Now we should check to make sure each BGP speaker (router running BGP) learn about their neighbors with the “show ip bgp summary” command:


Note: At this time, the “show ip bgp” commands on all routers show nothing and the “show ip route” commands only show directly connected networks. For example on R4:

Task 2: Advertise loopback0 on R1 to R4 and make sure R4 can ping to that loopback interface
First, create loopback 1.1.1.1/24 on R1 and advertise it
| R1(config)#interface loopback0 R1(config-if)#ip address 1.1.1.1 255.255.255.0 R1(config-if)#exit R1(config)#router bgp 1 R1(config-router)#network 1.1.1.0 mask 255.255.255.0 |
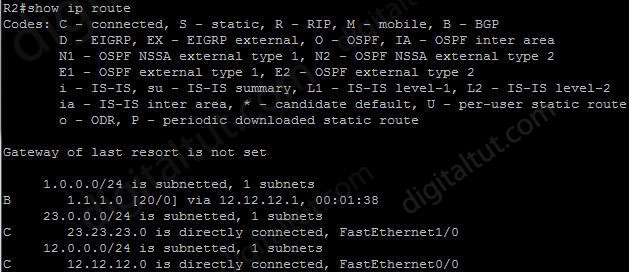
Now we can see that route in both the routing table and BGP routing table of R2.


By the way, let’s have a look of the output of the “show ip bgp” command on R3 at this time

Please notice the “Next Hop” field from the output above. We can see that although the loopback0 of R1 is learned from R2 (so the next hop field should be the fa1/0 interface of R2) but here the “Next Hop” field here is an interface on R1 (12.12.12.1). The reason is:
“For EBGP, the next hop is always the IP address of the neighbor specified in the neighbor command. For IBGP, the protocol states that the next hop advertised by EBGP should be carried into IBGP“. In this case, the next hop of EBGP (R1 on AS 1) will be installed into BGP of R3.
Therefore R3 needs an IGP (like OSPF, EIGRP…) to reach that EBGP router, if not it will drop all packets destined for network 1.1.1.0/24. In this case no IGP has been configured so a ping to 1.1.1.1 from R3 will surely fail because R3 doesn’t know how to reach 12.12.12.1.
Also, we can see that R3 can’t reach 1.1.1.0/24 with the “show ip bgp 1.1.1.0/24” command

This route is “inaccessible” so R3 will not advertise this route to R4 -> no network 1.1.1.0/24 is installed in the BGP routing table of R4

To overcome this problem, we can declare the “next-hop-self” on the edge router (R2). With this command, R2 will send its own IP address as the next hop instead of sending the EBGP next hop.
| R2(config-router)#neighbor 23.23.23.3 next-hop-self |
Now the Next Hop field will be an interface on R2 (23.23.23.2):

And network 1.1.1.0/24 is also installed in the BGP routing table of R4 because the route is now accessible and R3 advertises it to R4

Notice that although the network 1.1.1.0/24 exists in the BGP routing table but R4 still can’t ping to it

Check the BGP routing table of R1 we will see that R1 does not know how to reach 34.34.34.0 network -> R1 does not know how to send the “ping reply” (ICMP response) to R4.

To make a successful ping from R4, we must advertise network 34.34.34.0 on R4.
| R4(config-router)#network 34.34.34.0 mask 255.255.255.0 |
Now R1 has learned about network 34.34.34.0/24

Maybe we can now ping from R4 to loopback0? The answer is still no! Although the ping can reach loopback0 but the reply packets can’t reach R4 because there is a mistake on the BGP routing table of R2

As you can guess, the same problem “next hop advertised by EBGP should be carried into IBGP” occurs so we need to use the command:
| R3(config-router)#neighbor 23.23.23.2 next-hop-self |

Now we can ping from R4 to loopback0 on R1

Task 3: Make AS 23 not a transit AS
This is an important problem in real life. Suppose your company (with R2 & R3 routers) wants the connection to the Internet must be available in any time so your administrators hired two internet lines from two separate ISPs (R1 & R4). But improper configuration can make traffic flow from R1 -> R2 -> R3 -> R4 and your company becomes a transit AS. Surely your company does not want to receive this traffic as it takes much bandwidth of the company. We need to filter out this type of traffic.
The purpose of this task is opposite to task 2. We will make AS 23 not a transit AS by not advertising network 1.1.1.0 to R4. To do this, we will create a route-map for 1.1.1.0/24 and set the “no-export” attribute to this route:
|
R3(config)#access-list 1 permit 1.1.1.0 0.0.0.255 |
The “no-export” means “do not advertise this route to any EBGP peers” and this attribute is set to network 1.1.1.0/24 before entering R3 (because we apply this route-map on inbound direction to R3). Therefore R3 will understand “do not advertise 1.1.1.0/24 to any EBGP neighbor”, in this case EBGP neighbor is R4.

Also on R4 the 1.1.1.0/24 network disappears.

Another way to achieve the same result as above is configuring a route-map and apply it on the outbound direction of R2 (to R3):
| R2(config)#access-list 1 permit 1.1.1.0 0.0.0.255 R2(config)#route-map NOEXPORT permit 10 R2(config-route-map)#match ip address 1 R2(config-route-map)#set community no-export R2(config)#router bgp 23 R2(config-router)#neighbor 23.23.23.3 route-map NOEXPORT out |
For your information, we can use the “community no-export” on R1 on outbound direction to achieve the same result but notice you have to add the “send-community” feature so that the community attribute on R1 is sent to R2 because even if you set the community attribute on R1, this attribute does not transmit to BGP neighbors by default.
| R1(config)#access-list 1 permit 1.1.1.0 0.0.0.255 R1(config)#route-map NOEXPORT permit 10 R1(config-route-map)#match ip address 1 R1(config-route-map)#set community no-export R1(config)#router bgp 1 R1(config-router)#neighbor 12.12.12.2 route-map NOEXPORT out R1(config-router)#neighbor 12.12.12.2 send-community |
Now on R2 you will see

Also add “neighbor … send-community” command on R2 to propagate community attribute to R3
| R2(config)#router bgp 23 R2(config-router)#neighbor 23.23.23.3 send-community |
Now both R2 & R3 receive community attribute on R1

R3 knows network 1.1.1.0/24 is not allowed to advertise to R4 (R4 is an EBGP) so R4 does not have this route in its BGP routing table (note: we don’t need to set the “send-community” on R3 because R3 understands this route should “not be advertised to any peer”).

This is the end of this lab. I don’t upload the configuration files because I wish you to do it by yourself (I am sorry).


Amazing lab, normally figure on 300-101 now?? Thanks.
what if I want to do ping from R1 to R4?
I am confused, please help me….
For some reason the 2nd to last and last step would not work. When I put the route map on R1 to prevent R2 from receiving, R2 was still receiving the route 1.1.1.1. I read somewhere that you can’t filter an ip that’s configured on a router from being sent to a directly connected neighbor using the no-export command…that this only works for the hop after the neighbor…that for directly connected neighbors where the ip is configured on one of the neighbors that you would need to use a prefix list, distribution list or route map. But then how did digitaltut get it to work. Not sure if the ios makes a difference. I’m using 12.4
Ah, so actually this is working for me. And I understand better now what the point of this these last two exercises were – to prevent R4 from having a route to 1.1.1.1. So after doing these last two steps, R2 and R3 will still have a route to 1.1.1.1, it’s just that R2 will pass route and the community to R3, but R3 will not pass the route at all to R4 (because R4 is an eBGP neighbor to R3 and the “no-export” command only works with eBGP neighbors. The “no-export” command does not block iBGP neighbors from receiving the routes.
Mistake:
R3(config-router)#neighbor 23.23.23.3 remote-as 23
should be
R3(config-router)#neighbor 23.23.23.2 remote-as 23
R3(config)#router bgp 23
R3(config-router)#neighbor 23.23.23.3 remote-as 23
R3(config-router)#neighbor 34.34.34.4 remote-as 4
Correction:
R3(config)#router bgp 23
R3(config-router)#neighbor 23.23.23.2 remote-as 23
R3(config-router)#neighbor 34.34.34.4 remote-as 4
R3(config)#access-list 1 permit 1.1.1.0 0.0.0.255
R3(config)#route-map NOEXPORT permit 10
R3(config-route-map)#match ip address 1
R3(config-route-map)#set community no-export
R3(config)#router bgp 23
R3(config-router)#neighbor 23.23.23.2 route-map NOEXPORT in
Correction: I think it would be DENY:
R3(config)#access-list 1 deny 1.1.1.0 0.0.0.255
R3(config)#route-map NOEXPORT permit 10
R3(config-route-map)#match ip address 1
R3(config-route-map)#set community no-export
R3(config)#router bgp 23
R3(config-router)#neighbor 23.23.23.2 route-map NOEXPORT in