A virtual machine (VM) is a software emulation of a physical server with an operating system. From an application’s point of view, the VM provides the look and feel of a real physical server, including all its components, such as CPU, memory, and network interface cards (NICs).
A hypervisor, also known as a virtual machine monitor, is a software that creates and manages virtual machines. A hypervisor allows one physical server to support multiple guest VMs by virtually sharing its resources, such as memory and processing.
There are two types of hypervisors: type 1 and type 2 hypervisor.
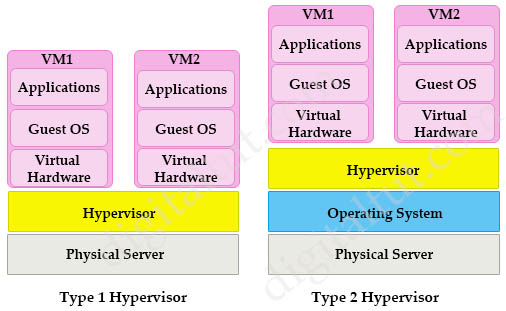
In type 1 hypervisor (or native hypervisor), the hypervisor is installed directly on the physical server. Then instances of an operating system (OS) are installed on the hypervisor. Type 1 hypervisor has direct access to the hardware resources. Therefore they are more efficient than hosted architectures. Some examples of type 1 hypervisor are VMware vSphere/ESXi, Oracle VM Server, KVM and Microsoft Hyper-V.
In contrast to type 1 hypervisor, a type 2 hypervisor (or hosted hypervisor) runs on top of an operating system and not the physical hardware directly. A big advantage of Type 2 hypervisors is that management console software is not required. Examples of type 2 hypervisor are VMware Workstation (which can run on Windows, Mac and Linux) or Microsoft Virtual PC (only runs on Windows).

READ MORE…
In this lab we will learn how to program Python (version 3) to telnet to GNS3 router in Windows 10 and do some configuration commands like create an interface on GNS3 router.

Our topology is very simple with only R1 router and a cloud (represented our real laptop/desktop). But please do not create a cloud now as we need to configure a Microsoft Loopback Adapter for it first so please follow the steps below.
READ MORE…
The ENCOR exam requires you to have some basic knowledge of Python for processing file, sending REST API and proceeding the response so we write this tutorial to help you grasp them.
First understand the dictionary type in Python. One of two ways to create the dictionary type is using a set of curly braces, {} like this:
# This creates a Python object (dictionary type):
data = {
"name": "John",
"age": 25
}
We will use this type regularly in below examples.
READ MORE…
Point-to-Point Protocol (PPP) is an open standard protocol that is mostly used to provide connections over point-to-point serial links. The main purpose of PPP is to transport Layer 3 packets over a Data Link layer point-to-point link. PPP can be configured on:
+ Asynchronous serial connection like Plain old telephone service (POTS) dial-up
+ Synchronous serial connection like Integrated Services for Digital Network (ISDN) or point-to-point leased lines.
PPP consists of two sub-protocols:
+ Link Control Protocol (LCP): set up and negotiate control options on the Data Link Layer (OSI Layer 2). After finishing setting up the link, it uses NCP.
+ Network control Protocol (NCP): negotiate optional configuration parameters and facilitate for the Network Layer (OSI Layer 3). In other words, it makes sure IP and other protocols can operate correctly on PPP link

READ MORE…
The main disadvantage of HSRP and VRRP is that only one gateway is elected to be the active gateway and used to forward traffic whilst the rest are unused until the active one fails. Gateway Load Balancing Protocol (GLBP) is a Cisco proprietary protocol and performs the similar function to HSRP and VRRP but it supports load balancing among members in a GLBP group. In this tutorial, we will learn how GLBP works.
| Note: Although we can partially configure load balancing via HSRP or VRRP using multiple groups but we have to assign different default gateways on the hosts. If one group fails, we must reconfigure the default gateways on the hosts, which results in extra administrative burden. |
Note: Although GLBP is no longer a topic in current ENCOR syllabus but you may see some questions related to it so it is better to learn GLBP as well.
GLBP Election
When the routers are configured to a GLBP group, they first elect one gateway to be the Active Virtual Gateway (AVG) for that group. The election is based on the priority of each gateway (highest priority wins). If all of them have the same priority then the gateway with the highest real IP address becomes the AVG. The AVG, in turn, assigns a virtual MAC address to each member of the GLBP group. Each gateway which is assigned a virtual MAC address is called Active Virtual Forwarder (AVF). A GLBP group only has a maximum of four AVFs. If there are more than 4 gateways in a GLBP group then the rest will become Standby Virtual Forwarder (SVF) which will take the place of a AVF in case of failure. The virtual MAC address in GLBP is 0007.b400.xxyy where xx is the GLBP group number and yy is the different number of each gateway (01, 02, 03…).
Note:
+ In this tutorial, the words “gateway” and “router” are use interchangeable. In fact, GLBP can run on both router and switch so the word “gateway”, which can represent for both router and switch, is better to describe GLBP.
+ For switch, GLBP is supported only on Cisco 4500 and 6500 series. |
The gateway with the highest priority among the remaining ones is elected the Standby AVG (SVG) which will take the role of the AVG in the case it is down.

READ MORE…
Basic understanding about BGP
We really want to show you why we need BGP first but it is very difficult to explain without understanding a bit about BGP. So we will learn some basic knowledge about BGP first.
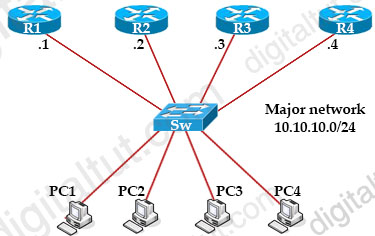
First we need to understand the difference between Interior Gateway Protocol and Exterior Gateway Protocol, which is shown below:

– Interior Gateway Protocol (IGP): A routing protocol operating within an Autonomous System (AS) like OSPF, EIGRP… Usually routers running IGP are under the same administration (of a company, corporation, individual)
– Exterior Gateway Protocol (EGP): A routing protocol operating between different AS. BGP is the only EGP used nowadays
READ MORE…
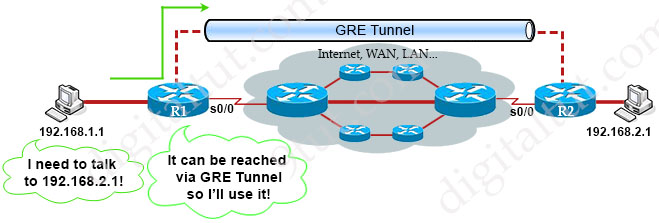
GRE stands for Generic Routing Encapsulation, which is a very simple form of tunneling. With GRE we can easily create a virtual link between routers and allow them to be directly connected, even if they physically aren’t. Let’s have a look at the topology below:

Suppose R1 and R2 are routers at two far ends of our company. They are connected to two computers who want to communicate. Although R1 and R2 are not physically connected to each other but with GRE Tunnel, they appear to be! This is great when you have multiple end points and don’t care the path between them. The routing tables of two routers show that they are directly connected via GRE Tunnel.
READ MORE…
Network Configuration Protocol (NETCONF), like the traditional CLI mode and SNMP, is a network device management protocol. It provides a mechanism for configuring devices and querying the network configuration and status. So why should we use NETCONF instead of CLI? The main reason is: NETCONF is ideal for network automation and cloud-based networks.
The traditional CLI mode is designed to be used by humans and based on man-machine interfaces. The CLI provides humans with a very user-friendly means for interacting with a device. Commands are very readable, easy to remember and have no painful syntactic requirements. But the configuration varies with vendors. The same command is implemented in different ways on different devices and on different vendors. Therefore, the manual learning and maintaining cost is high.
READ MORE…
Postman and RESTCONF are two topics that we need to grasp in the ENCOR exam so in this tutorial we will learn the basis about them. In order to complete this tutorial, please download and install Postman first. This is a simple task so we will not mention it here.
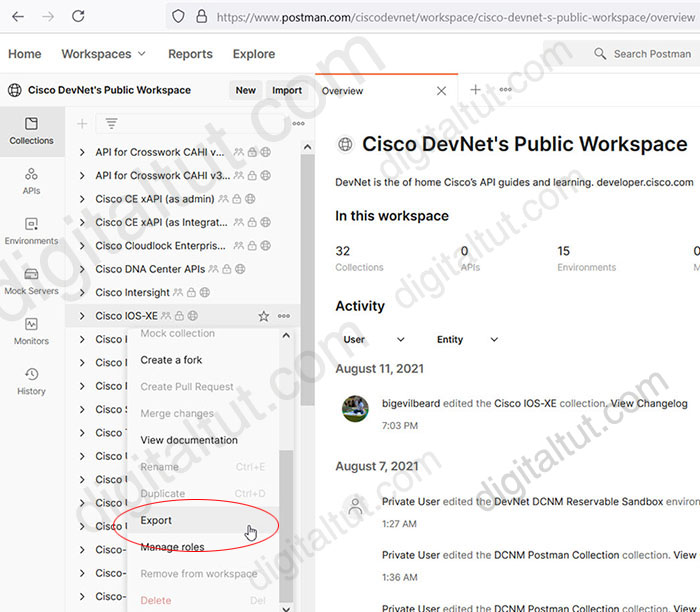
After installing Postman, go to this Postman link and export the Cisco IOS-XE collection to a file on your local drive because we are going to communicate to a Cisco IOS XE router via Postman.

READ MORE…
EEM (Embedded Event Manager) is a software component of Cisco that allows network administrators to automate many tasks. EEM is like a programming language with “if {condition} then {action}” statement. If your condition is met then some “actions” will be performed automatically on the device.
An EEM consists of two major components:
+ Event: Defines the event to be monitored
+ Action: Defines action to be taken when the event is triggered
There are three steps to creating an EEM applet.
Step 1. Create the applet and give it a name with the command “event manager applet applet-name“
Step 2 (Optional). Tell the applet what to look out for (just optional as some applets do not need to look out anything), usually with “event cli pattern” command
Step 3. Define action to be taken when the event is triggered in step 2, usually with “action” or “set” command.
READ MORE…


